
Choosing the right and installing recessed lights properly will help ensure the lighting and aesthetics of your outdoor space. Below are important steps to choose and install quality recessed lights that you should know.
1. How to choose quality floor lights
1.1. Choose the right light for the space
Choosing recessed floor lights should focus on meeting the lighting and decorative needs of outdoor spaces.
For walkways: Choose lights with strong light, creating highlights and safety.
Decoration needs : Determine where light is needed, how wide it needs to be, and what color it needs to be.
 |
| Application of outdoor floor lights |
1.2. Capacity and shape
Recessed floor lights come in a variety of wattages and shapes, from 1w to 36w, round and square.
For large spaces : Choose large capacity such as 18w, 24w, or 36w.
For small spaces: Choose smaller capacities such as 1w, 3w, 5w.
Shape: Choose between round or square floor lamps, depending on your preference and design style.
1.3. Light color
White : For garden space and walkways, creating a natural feeling and convenient for moving at night.
Yellow : Creates warmth, suitable for entertainment spaces.
For entertainment spaces : Use multi-colored lights to create a striking and attractive effect.
1.4. Reputable brand
Choose from reputable brands like Haledco to ensure quality and performance.
This unit offers quality floor lighting products with a 2-year warranty and an impressive lifespan of up to 65,000 hours.
Products are diverse in design and style, helping you easily choose according to the style and design of your exterior space.
Haledco is not only a quality choice but also a safe and effective investment for your exterior lighting.
2. Safe installation process of recessed floor lights
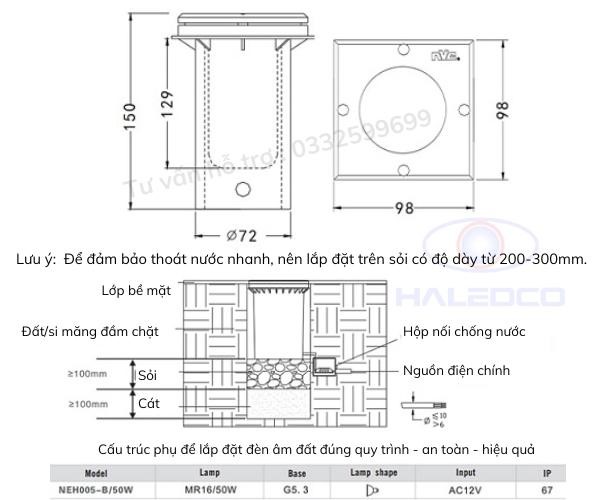 |
| Instructions for installing underground lights safely and effectively |
Step 1: Disconnect the power
Disconnect the power before starting installation to ensure absolute safety when installing outdoor and indoor recessed floor lights.
Step 2: Remove the protector and place it in the cutout.
Remove the lamp guards and place them into the previously prepared holes.
Fix the light with an outer layer of concrete to ensure stability and durability.
Step 3: Connect the wires
Use high quality electrical wire and practice proper wiring techniques.
Check the connection to ensure safety during use.
Step 4: Insert the light into the hole
Install the lights in the chosen location and use screws to secure them securely.
3. Periodic maintenance and inspection
- Perform periodic maintenance to check operating condition and clean lamp surface.
- Make sure all electrical connections are made properly to avoid the risk of fire or safety hazards.
- Periodic safety checks to ensure stable system operation.
If you are not confident or have no experience, hiring a professional is the best option to ensure the installation process is accurate and safe. Please contact hotline: 0332599699 for the fastest advice and support.
Source


Comment (0)